PDF下载: Kubernetes 集群安装 - Kubekey.pdf (491.7 KB)
首先准备一台 Linux 或者 OSX 操作系统的主机,用于安装部署工具以及执行安装操作
工具安装
找一个合适的工作目录,如:
$ mkdir k8s
$ cd k8s
首先下载 Kubekey,受网络限制,一般无法正常访问 Github 和 Googleapis,Kubekey 支持使用国内服务,需要配置 KKZONE=cn 环境变量
在下载 KubeKey 后,如果将其传至新的机器,且访问 Googleapis 同样受限,在执行以下步骤之前请务必再次执行
export KKZONE=cn命令,包括 SSH 断开重连
$ export KKZONE=cn
下载 Kubekey,VERSION 为 Kubekey 版本,当前最新版本为 v3.0.2,更多版本参考 kubekey/releases
$ curl -sfL https://get-kk.kubesphere.io | VERSION=v3.0.2 sh -
下载完成后,ll 检查下载内容, kk 是 Kubekey 的命令行工具,如果需要可以选择 mv 到 /usr/bin 等 PATH 中的目录,这里选择继续在当前目录操作
$ ll
-rwxr-xr-x.  1 root root 79648122 Nov 22 10:07 kk
-rw-r--r--.  1 root root 36060452 Nov 30 21:37 kubekey-v3.0.2-linux-amd64.tar.gz

# 版本信息
$ ./kk version
kk version: &version.Info{Major:"3", Minor:"0", GitVersion:"v3.0.2", GitCommit:"1c395d22e75528d0a7d07c40e1af4830de265a23", GitTreeState:"clean", BuildDate:"2022-11-22T02:04:26Z", GoVersion:"go1.19.2", Compiler:"gc", Platform:"linux/amd64"}
查看帮助信息,了解 kk,本文主要使用 kk create config/cluster
官方介绍文档 https://github.com/kubesphere/kubekey/blob/master/README_zh-CN.md
# kk 帮助信息
$ ./kk -h
Deploy a Kubernetes or KubeSphere cluster efficiently, flexibly and easily. There are three scenarios to use KubeKey.
1. Install Kubernetes only
2. Install Kubernetes and KubeSphere together in one command
3. Install Kubernetes first, then deploy KubeSphere on it using https://github.com/kubesphere/ks-installer

Usage:
  kk [command]

Available Commands:
  add         Add nodes to kubernetes cluster
  alpha       Commands for features in alpha
  artifact    Manage a KubeKey offline installation package
  certs       cluster certs
  completion  Generate shell completion scripts
  create      Create a cluster or a cluster configuration file
  delete      Delete node or cluster
  help        Help about any command
  init        Initializes the installation environment
  plugin      Provides utilities for interacting with plugins
  upgrade     Upgrade your cluster smoothly to a newer version with this command
  version     print the client version information

Flags:
  -h, --help   help for kk

Use "kk [command] --help" for more information about a command.

# kk create 帮助信息
$ ./kk create -h
Create a cluster or a cluster configuration file

Usage:
  kk create [command]

Available Commands:
  cluster     Create a Kubernetes or KubeSphere cluster
  config      Create cluster configuration file
  manifest    Create an offline installation package configuration file

Flags:
      --debug              Print detailed information
  -h, --help               help for create
      --ignore-err         Ignore the error message, remove the host which reported error and force to continue
      --namespace string   KubeKey namespace to use (default "kubekey-system")
  -y, --yes                Skip confirm check

Use "kk create [command] --help" for more information about a command.
集群配置
接下来开始具体的安装配置工作,Kubekey 支持多种安装方式,如直接 ./kk create cluster ,直接在本机安装 Kubernetes,接下来重点介绍一种比较通用的安装过程:
-
kk create config先生成yaml配置 - 通过调整配置定制 Kubernetes 集群
-
kk create cluster部署集群
# 生成 yaml 配置
$ ./kk create config -f config.yaml
注意默认为 Kubernetes 集群部署,如果要同时部署 KubeSphere,通过
--with-kubesphere指定版本,如:./kk create config --with-kubesphere v3.3.1 -f config.yaml,在生成的yaml中会增加apiVersion: installer.kubesphere.io/v1alpha1的配置,详细在此不做介绍
cat config.yaml 查看 yaml 配置内容
apiVersion: kubekey.kubesphere.io/v1alpha2
kind: Cluster
metadata:
  name: sample
spec:
  hosts:
  - {name: node1, address: 172.16.0.2, internalAddress: 172.16.0.2, user: ubuntu, password: "Qcloud@123"}
  - {name: node2, address: 172.16.0.3, internalAddress: 172.16.0.3, user: ubuntu, password: "Qcloud@123"}
  roleGroups:
    etcd:
    - node1
    control-plane:
    - node1
    worker:
    - node1
    - node2
  controlPlaneEndpoint:
    ## Internal loadbalancer for apiservers
    # internalLoadbalancer: haproxy

    domain: lb.kubesphere.local
    address: ""
    port: 6443
  kubernetes:
    version: v1.23.10
    clusterName: cluster.local
    autoRenewCerts: true
    containerManager: docker
  etcd:
    type: kubekey
  network:
    plugin: calico
    kubePodsCIDR: 10.233.64.0/18
    kubeServiceCIDR: 10.233.0.0/18
    ## multus support. https://github.com/k8snetworkplumbingwg/multus-cni
    multusCNI:
      enabled: false
  registry:
    privateRegistry: ""
    namespaceOverride: ""
    registryMirrors: []
    insecureRegistries: []
  addons: []
最快捷的安装只需要修改 yaml 中 spec.hosts 和 spec.roleGroups,具体节点资源根据情况进行分配
-
hosts配置所有主机节点的 IP 地址以及登录凭证 -
roleGroups则将节点用于不同的作用,Etcd 集群、K8S 控制面以及 Worker 资源池节点。
以典型的单节点和三节点为例:
# 单节点
spec:
  hosts:
  - {name: node1, address: 172.16.0.2, internalAddress: 172.16.0.2, user: ubuntu, password: "Qcloud@123"}
  roleGroups:
    etcd:
    - node1
    control-plane:
    - node1
    worker:
    - node1

# 三节点,
spec:
  hosts:
  - {name: node1, address: 172.16.0.2, internalAddress: 172.16.0.2, user: ubuntu, password: "Qcloud@123"}
  - {name: node2, address: 172.16.0.3, internalAddress: 172.16.0.3, user: ubuntu, password: "Qcloud@123"}
  - {name: node3, address: 172.16.0.4, internalAddress: 172.16.0.4, user: ubuntu, password: "Qcloud@123"}
  roleGroups:
    etcd:
    - node1
    control-plane:
    - node1
    worker:
    - node1
    - node2
    - node3
address和internalAddress可以理解为内、外网 IP,如在本地使用 Kubekey 操作云上资源部署 Kubernetes 集群,则address配置公网 IP,internalAddress配置 VPC 内网 IP,外网 IP 用于 kubekey 与主机做连接部署,内网 IP 用于 K8S 集群节点的通信
其它配置无特殊要求可以选择默认,介绍几个常用的配置:
spec:
  kubernetes:
    # Kubernetes 版本,每个 Kubekey 版本有一个支持矩阵,详细参考官方文档
    # https://github.com/kubesphere/kubekey#kubernetes-versions
    version: v1.23.10
    # CNI 选择,默认仍然为 docker,可以切换为 containerd
    containerManager: containerd
  network:
  	# 网络插件,默认 calico,可以换为 cilium 等网络
    plugin: calico
集群安装
完成以上配置后,执行安装命令
$ ./kk create cluster -f config.yaml

+-------+------+------+---------+----------+-------+-------+---------+-----------+--------+--------+------------+------------+-------------+------------------+--------------+
| name  | sudo | curl | openssl | ebtables | socat | ipset | ipvsadm | conntrack | chrony | docker | containerd | nfs client | ceph client | glusterfs client | time         |
+-------+------+------+---------+----------+-------+-------+---------+-----------+--------+--------+------------+------------+-------------+------------------+--------------+
| node1 | y    | y    | y       | y        |       | y     |         |           | y      |        |            | y          |             | y                | CST 22:15:23 |
| node2 | y    | y    | y       | y        |       | y     |         |           | y      |        |            | y          |             | y                | CST 22:15:23 |
| node3 | y    | y    | y       | y        |       | y     |         |           | y      |        |            | y          |             | y                | CST 22:15:23 |
+-------+------+------+---------+----------+-------+-------+---------+-----------+--------+--------+------------+------------+-------------+------------------+--------------+

22:15:23 CST [ERRO] node1: conntrack is required.
22:15:23 CST [ERRO] node1: socat is required.
运行后 kk 会先测试主机的连通性和凭证,以及基础依赖环境检查 ,如果有 xxx is required 内容导致安装中止,根据提示安装对应依赖,常见的一般是以下两项 conntrack 和 socat
$ yum install -y socat conntrack
依赖安装完成后重新执行
$ ./kk create cluster -f config.yaml

# 一切检查正常,可进行安装

# 出现以下提示,输入 yes,开始自动化安装
Continue this installation? [yes/no]:

# 依赖下载与安装
# kubeadm、kubelet、kubectl、containerd、etcd等依赖

# 镜像拉取
# kube-apiserver、kube-controller-manager、kube-proxy、coredns等服务镜像

# 最后输出结果
22:34:51 CST Pipeline[CreateClusterPipeline] execute successfully
Installation is complete.

Please check the result using the command:
        kubectl get pod -A
安装完成后验证
# ① 登录到 node 节点,如果安装操作是在 node 主机上进行则跳过

# ② kubectl 查看 pod status
$ kubectl get pod -A
NAMESPACE     NAME                                       READY   STATUS    RESTARTS   AGE
kube-system   calico-kube-controllers-676c86494f-6kgs6   1/1     Running   0          65m
kube-system   calico-node-bh9q7                          1/1     Running   0          65m
kube-system   calico-node-hvmmq                          1/1     Running   0          65m
kube-system   calico-node-vmm47                          1/1     Running   0          65m
...

# ③ kubectl 查看 Server Version
$ kubectl version
Client Version: version.Info{Major:"1", Minor:"23", GitVersion:"v1.23.10", GitCommit:"7e54d50d3012cf3389e43b096ba35300f36e0817", GitTreeState:"clean", BuildDate:"2022-08-17T18:32:54Z", GoVersion:"go1.17.13", Compiler:"gc", Platform:"linux/amd64"}
Server Version: version.Info{Major:"1", Minor:"23", GitVersion:"v1.23.10", GitCommit:"7e54d50d3012cf3389e43b096ba35300f36e0817", GitTreeState:"clean", BuildDate:"2022-08-17T18:26:59Z", GoVersion:"go1.17.13", Compiler:"gc", Platform:"linux/amd64"}
Dashboard
要在本地连接 K8S 集群,先获取到集群 kubeconfig 配置
# ① 登录到 node 节点,如果安装操作是在 node 主机上进行则跳过

# ② 获取 kubeconfig
$ cat ~/.kbue/config
# 内容如下:
apiVersion: v1
clusters:
- cluster:
    certificate-authority-data: ""
    server: https://lb.kubesphere.local:6443
  name: cluster.local
contexts:
- context:
    cluster: cluster.local
    user: kubernetes-admin
  name: kubernetes-admin@cluster.local
current-context: kubernetes-admin@cluster.local
kind: Config
preferences: {}
users:
- name: kubernetes-admin
  user:
    client-certificate-data: ""
    client-key-data: ""
注意在使用时需要将 server: https://172.16.0.2:6443 的 Host 改为 node1 的主机 IP,如: server: https://10.202.63.3:6443
有了 kubeconfig 后可以通过 kubectl 连接集群,如何安装、使用参考官方文档 安装工具#kubectl ,查看 Kubernetes 资源使用 Dashboard 工具会更方便,推荐使用 Lens、KubePi、kube-explorer等工具
- Lens 为桌面端工具,优点是集成有终端可以自动在不同集群间切换上下文
- KubePi 为 Web 端工具,同样支持多集群的管理
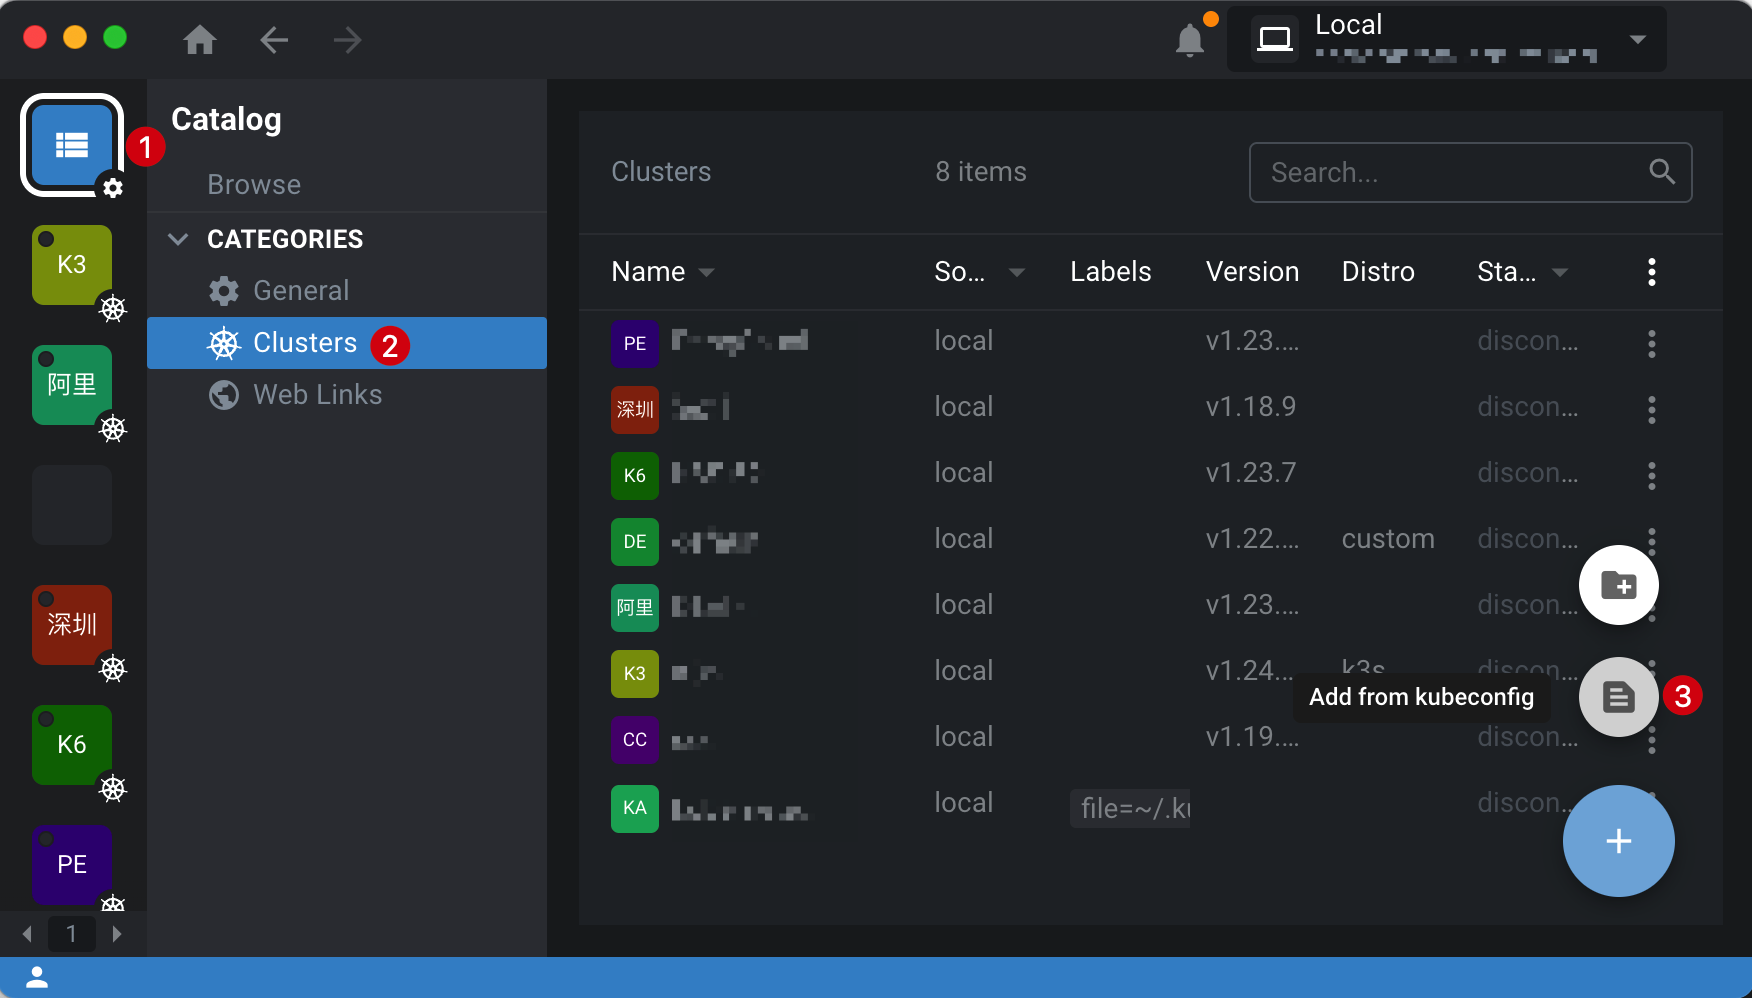
Lens
右下角添加选择 Add from kubeconfig ,将上文修改了 Server 配置的 Kubeconfig 粘贴即可
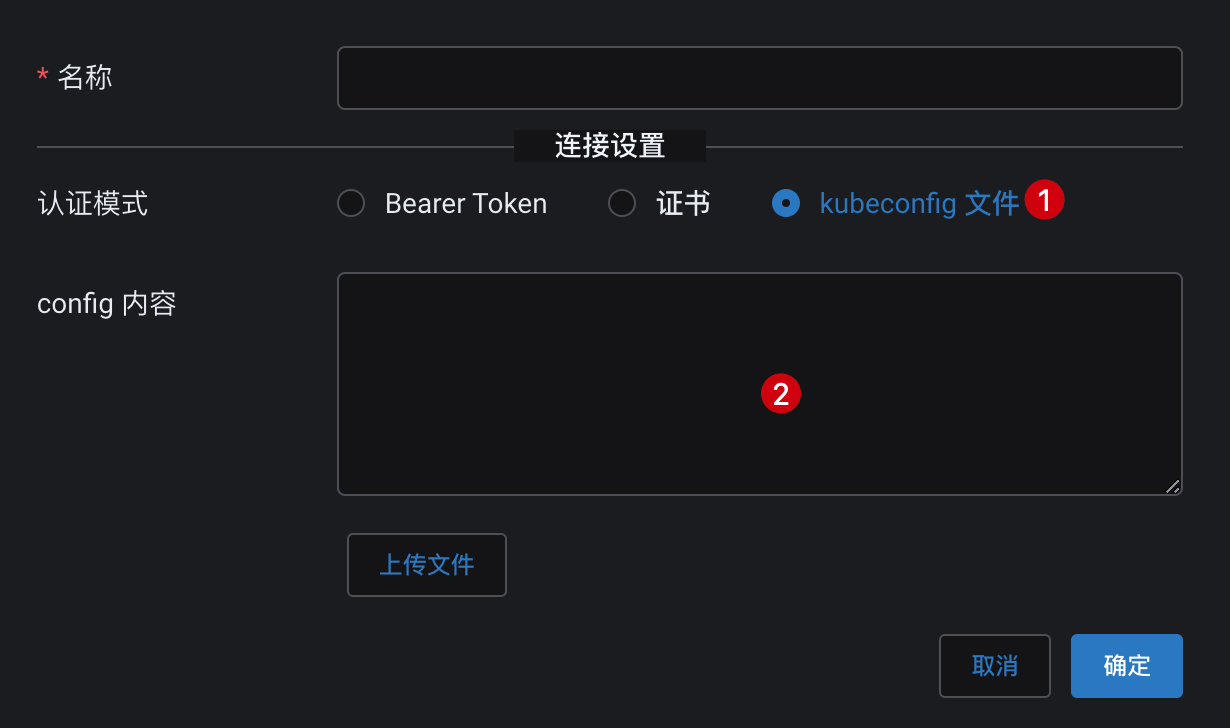
KubePi
https://kubeoperator.io/docs/kubepi/install/ 选择 Docker 方式部署很便捷
服务启动并登录后,在 集群列表 选择 导入,然后认证模式选择 Kubeconfig,同样将上文修改了 Server 配置的 Kubeconfig 粘贴即可。